Door Access Control framework
Getting Started
This documentation introduces the Access Control Framework available in Vik Channel Manager.
The framework becomes accessible by enabling the “Door Access Control” channel in your E4jConnect subscription plan. It is designed to connect the rooms created in Vik Booking with modern smart-lock systems, making digital key management and door access operations significantly easier.
The main purpose of this framework is to simplify and enhance access security for properties such as hotels, BnBs, apartments, and offices. It provides a single, unified interface for performing essential tasks, including generating door keys, opening and closing doors remotely, managing key validity periods, and much more.
The first available integration is TTLock, one of the most widely adopted smart-lock platforms in the industry. Through this framework, TTLock’s features can be managed more efficiently and seamlessly within e4jconnect solutions. However, the framework has been designed to be fully extensible, allowing additional Door Access Control systems to be integrated with minimal effort and used in a unified way.
The following sections will explain the TTLock integration and how it operates.
Provider - Initial Setup Guide
1. Starting the configuration process
To begin configuring your Smartlocks, open Vik Channel Manager, select Door Access Control as the active channel from the top-right dropdown menu, and navigate to Hotel → Devices.
All Smartlock setup steps will be completed from this section.
Creating a New Profile
Once you are on the Hotel → Devices page, click on the Configuration tab. If this is your first time configuring Smartlocks, you should already be on the correct screen.
Make sure that:
- In our example TTLock is selected as the integration (top-right selector).
- You are on the Configuration tab.
- In Profile Settings, select New Profile from the dropdown menu.

2. Provider Account Configuration
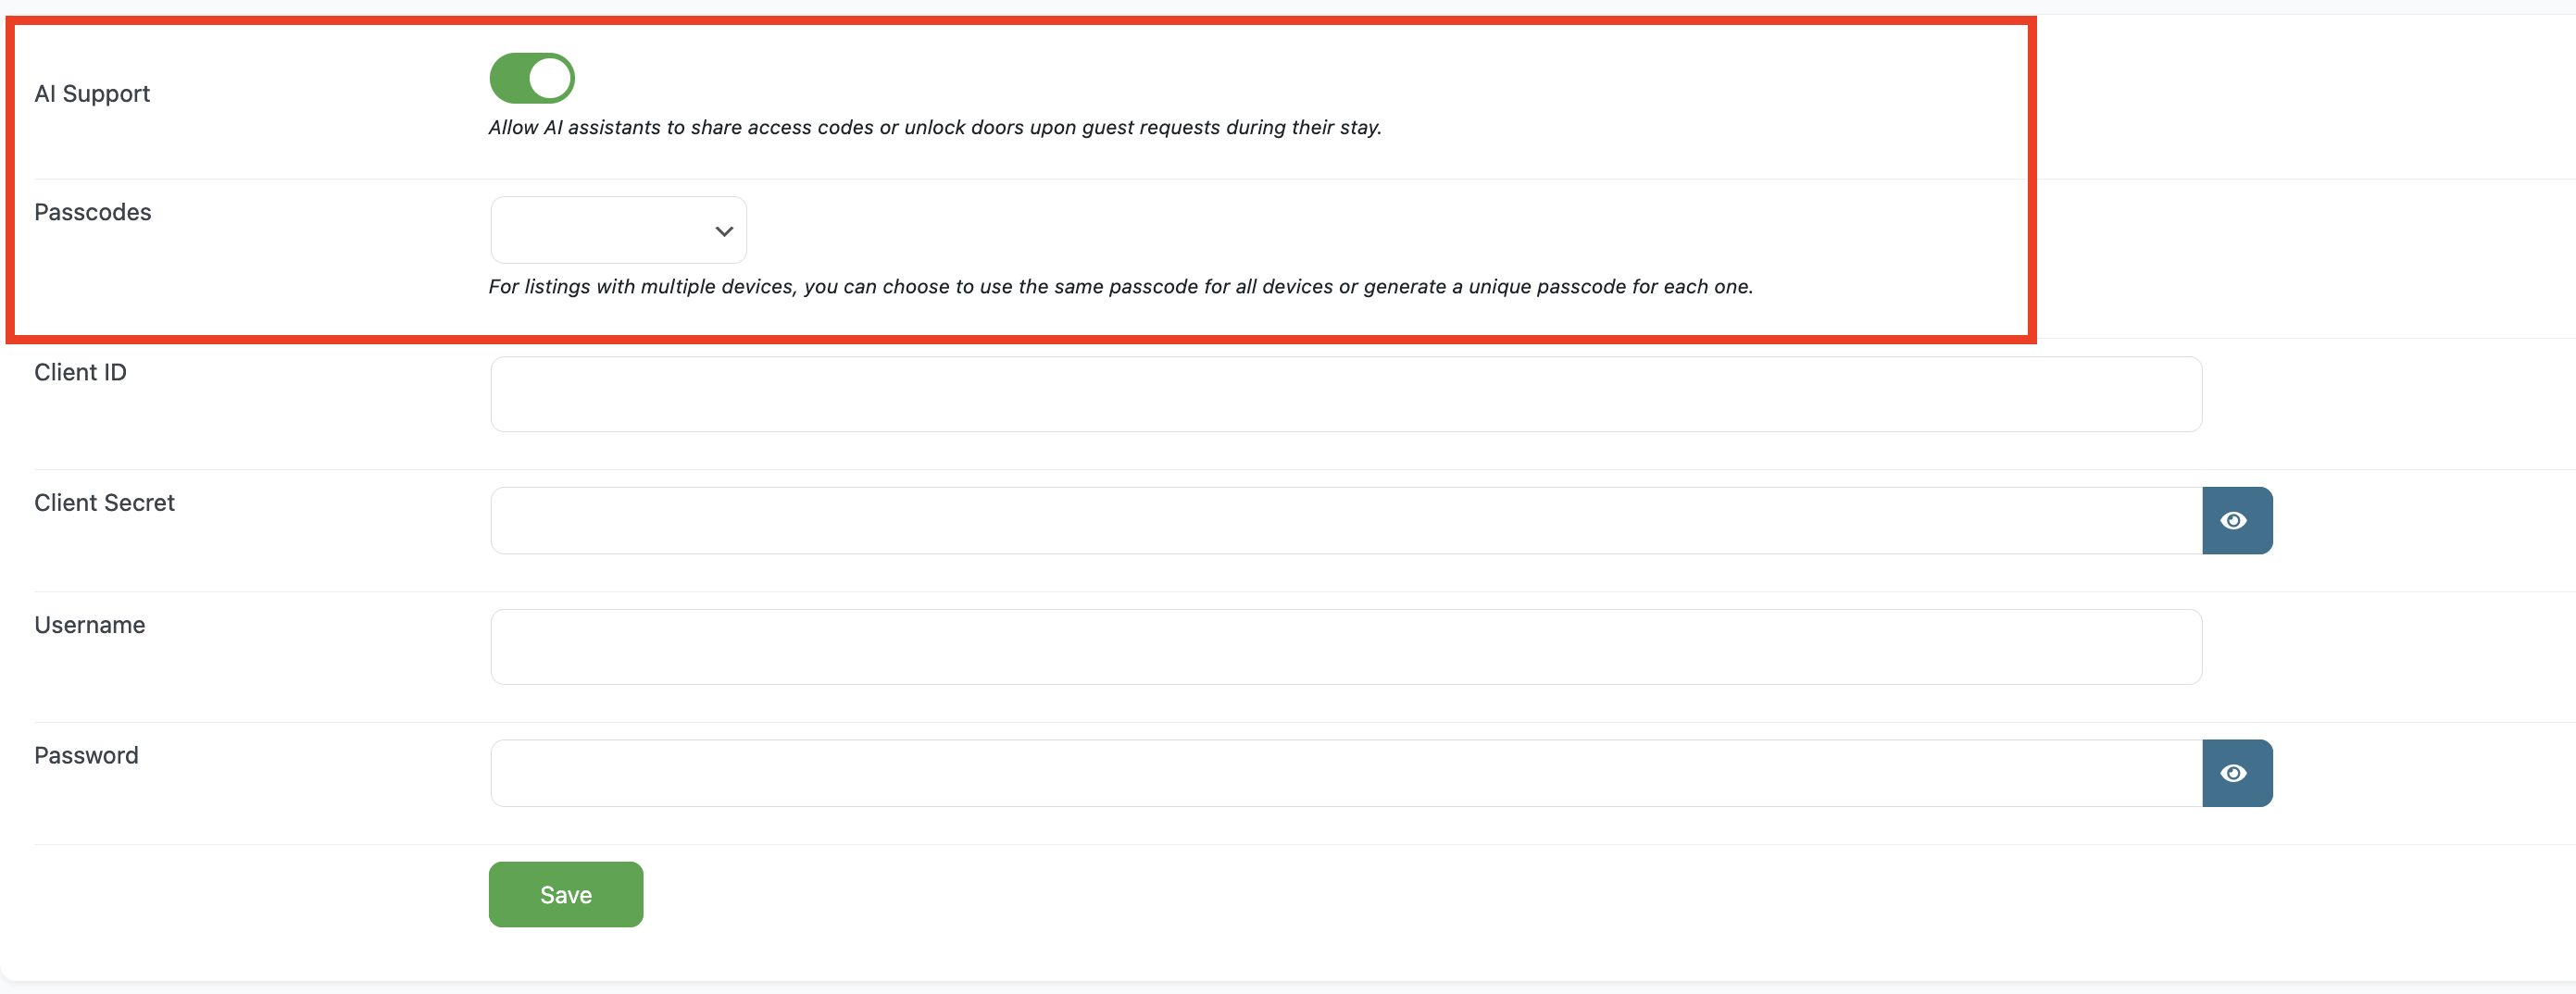
You can now begin filling out the required fields:
- Profile Name
Choose any name you prefer. This is only for internal use and will not be visible to guests. - Passcodes Generation
Choose whether codes should be generated at the time of booking or only shortly before check-in.
Note: In both cases, the passcode becomes active only on the check-in date.
Scroll down to enter the required information needed to connect your TTLock Account. This information is required for Vik Channel Manager to communicate with your Smartlocks. All requested details can be retrieved from your personal TTLock account.
You will also find two additional options:
- AI Support
Decide whether the AI Assistant may share passcodes with guests on request, or remotely lock/unlock doors. Enable this if you want the AI Assistant to manage access information; disable it to restrict AI access. - Passcodes
Choose whether you want one passcode per reservation or different passcodes per device. For example, if a guest needs both a Main Gate code and a Room Door code, you can choose to generate either:- one universal passcode that opens both, or
- two separate codes.
Once all fields are completed, click Save at the bottom to finalize this step.
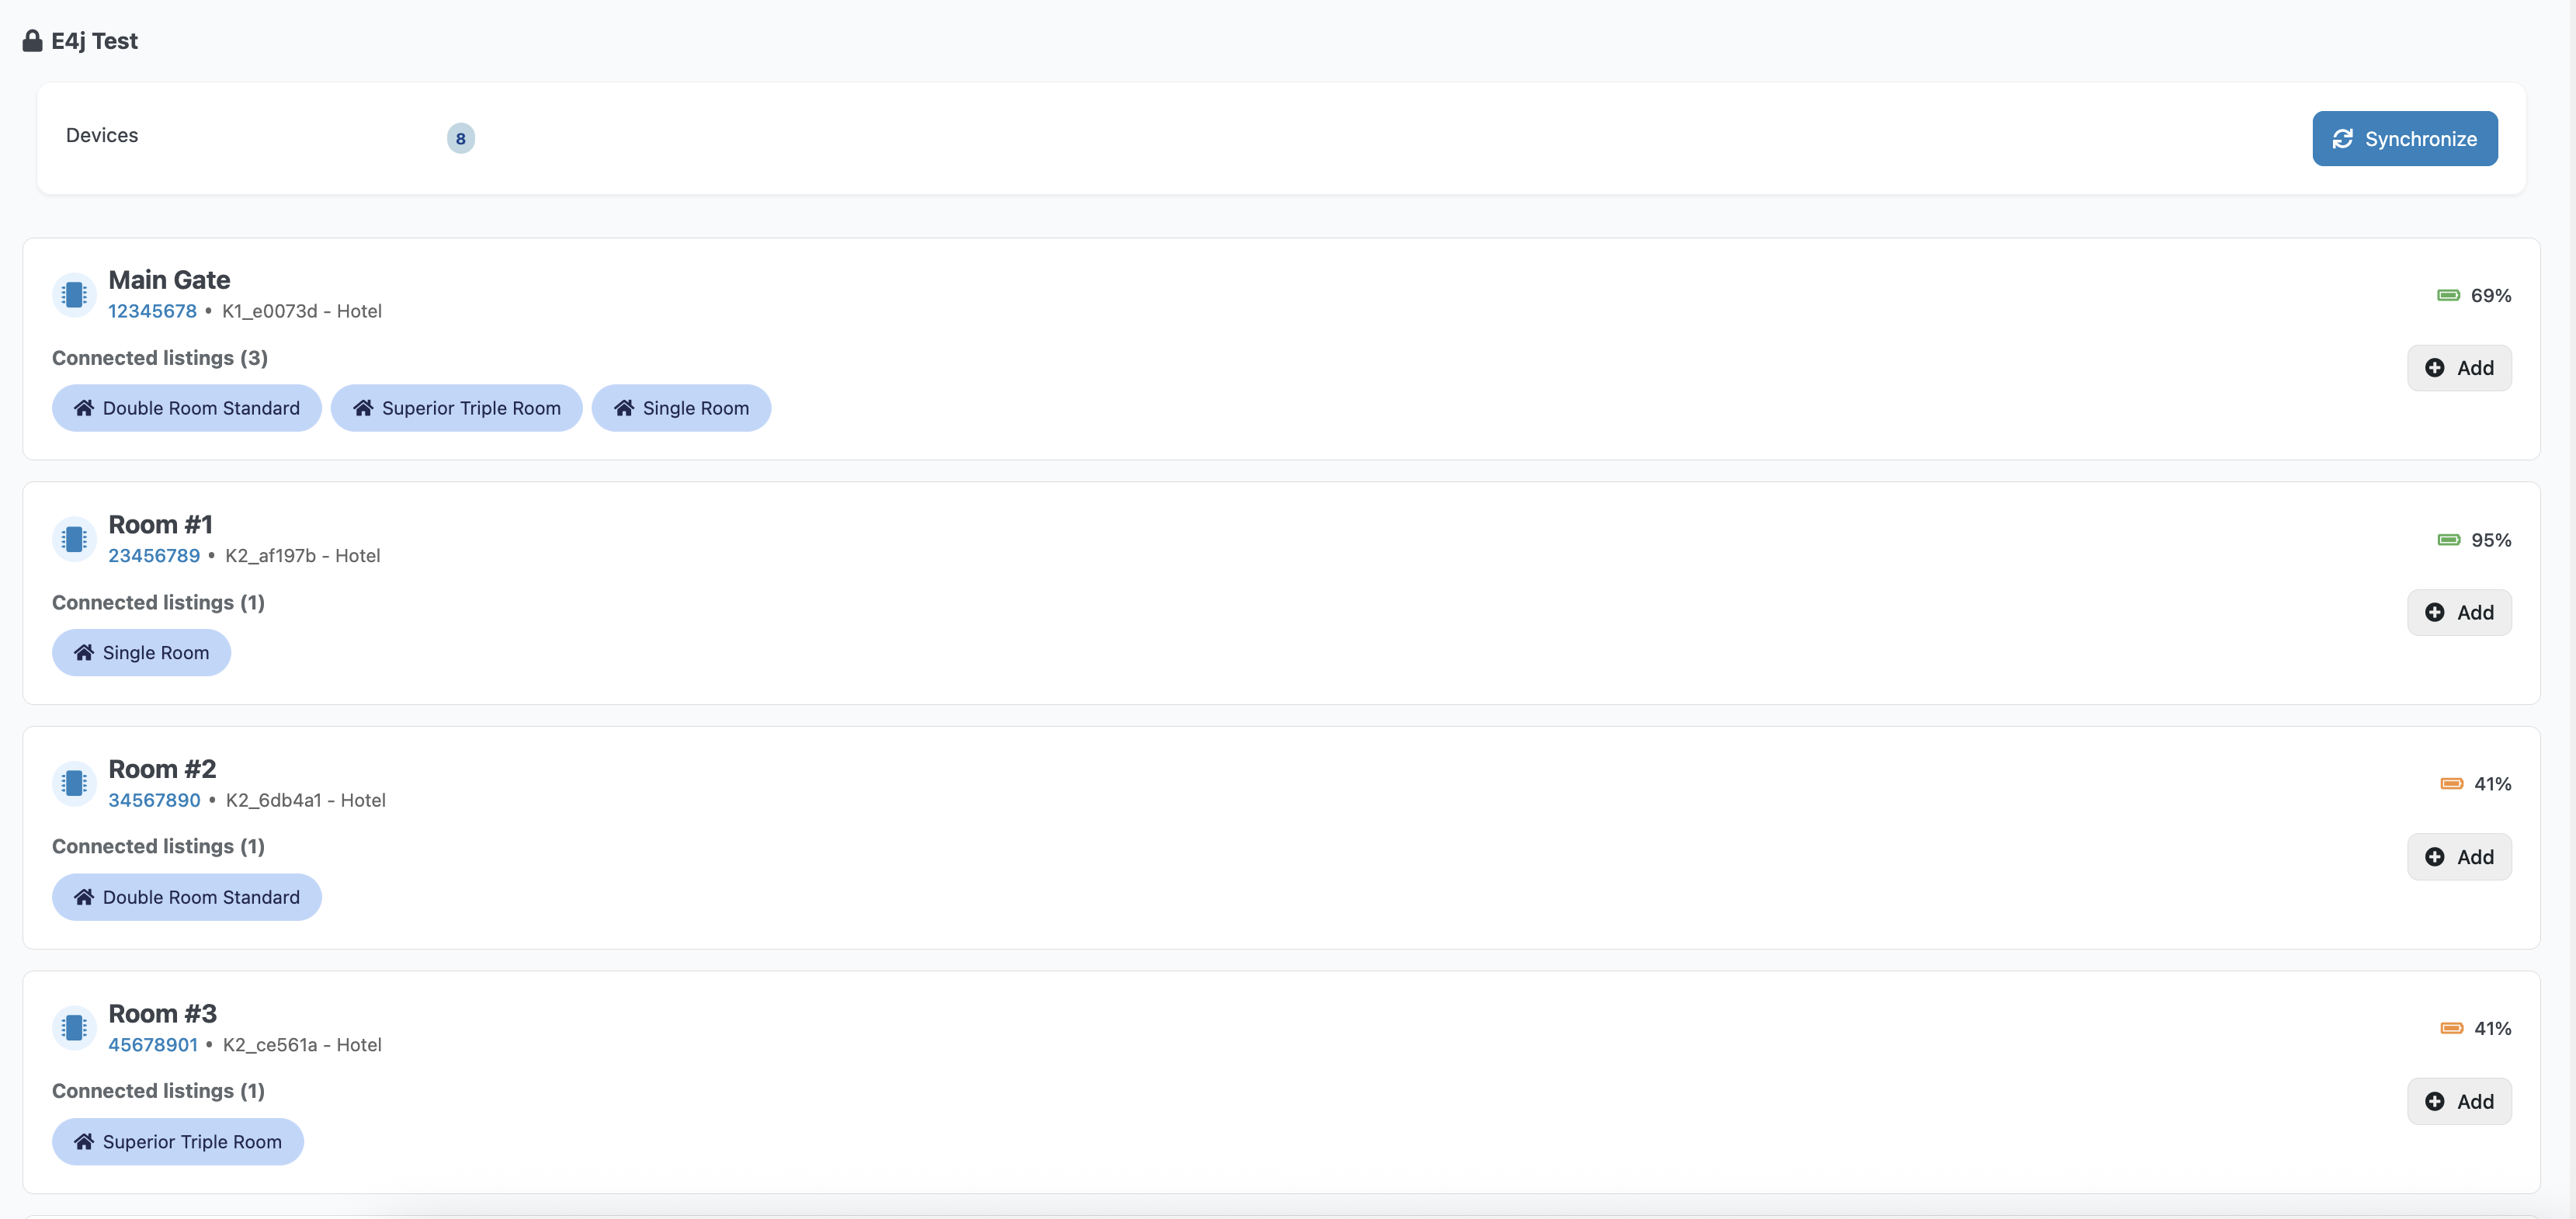
3. Smarlocks Synchronization
If the previous steps were completed correctly, Vik Channel Manager will now be able to access the Smartlocks available in your TTLock account. The next step is to match each Smartlock with the appropriate room in Vik Booking.
After saving your new profile, a new tab named Devices will appear at the top of the page.
Click on Devices, then on Synchronize on the right side.

During synchronization, Vik Channel Manager will retrieve all Smartlocks associated with your TTLock account and display them in a list.
You will notice that none of the locks are yet assigned to rooms. Now you can match each lock with the corresponding room or apartment.
Note: A Smartlock can be assigned to multiple rooms. This is ideal for shared entrances such as a Main Gate or a common access door.
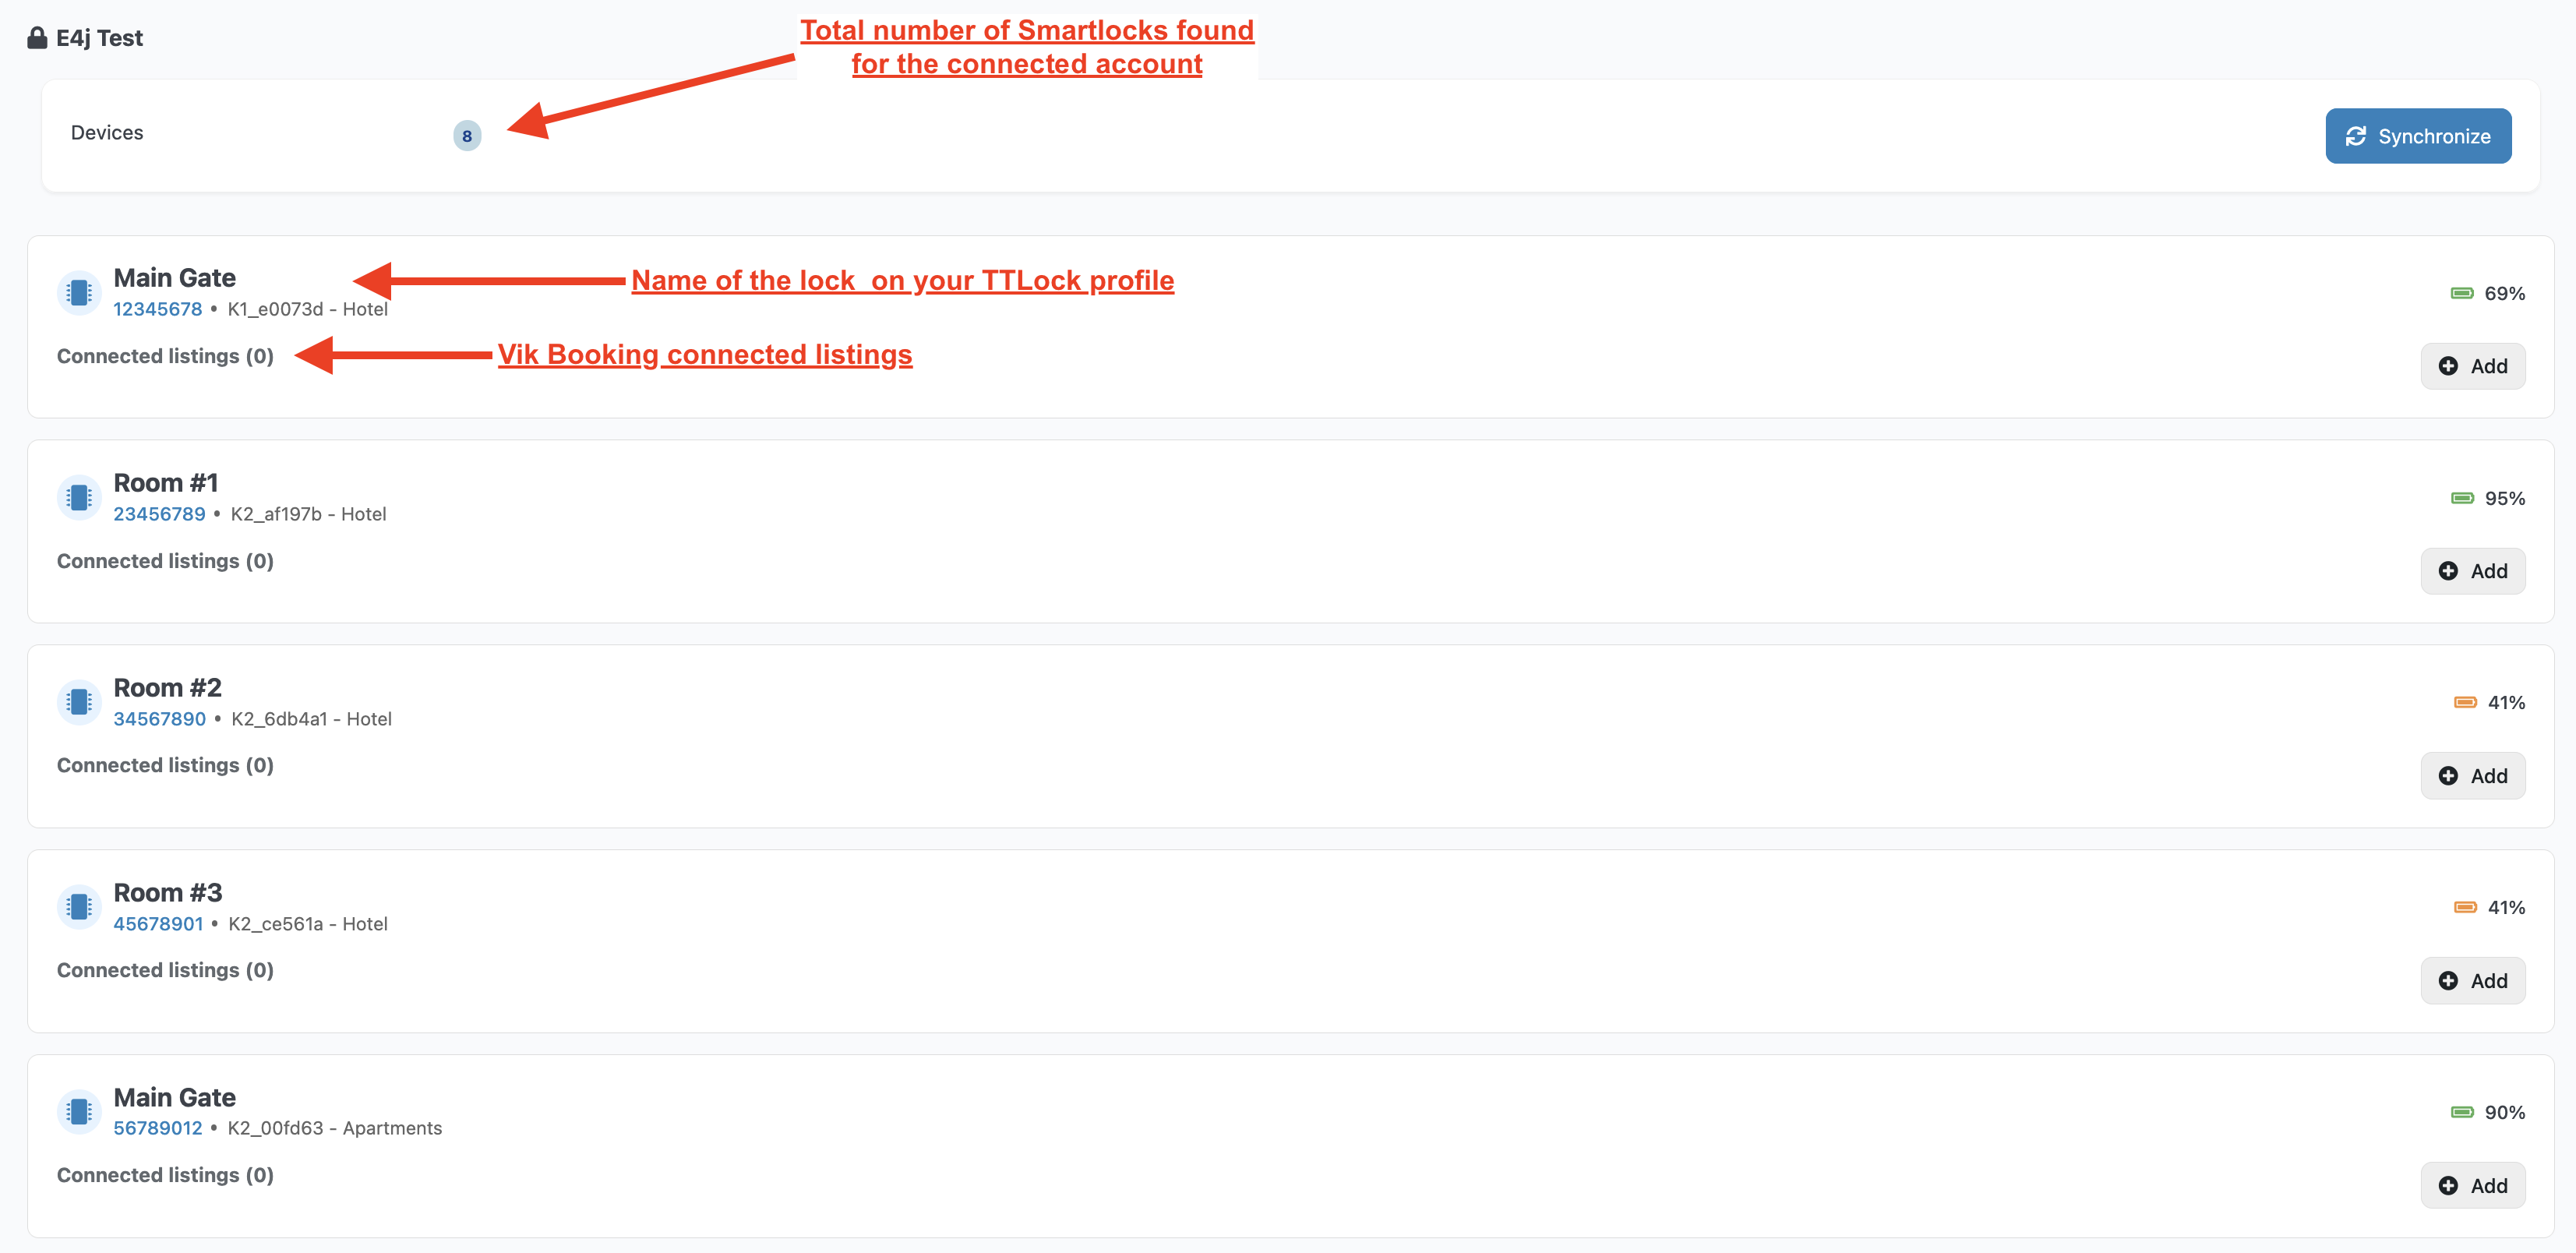
To assign a lock:
- Click Add next to the Smartlock
- Select the correct listing in the popup window.
- Click Apply to confirm

Example Setup
- Room 1 → Single Room
- Room 2 → Double Room Standard
- Room 3 → Triple Room Deluxe
- Main Entrance → linked to all three rooms
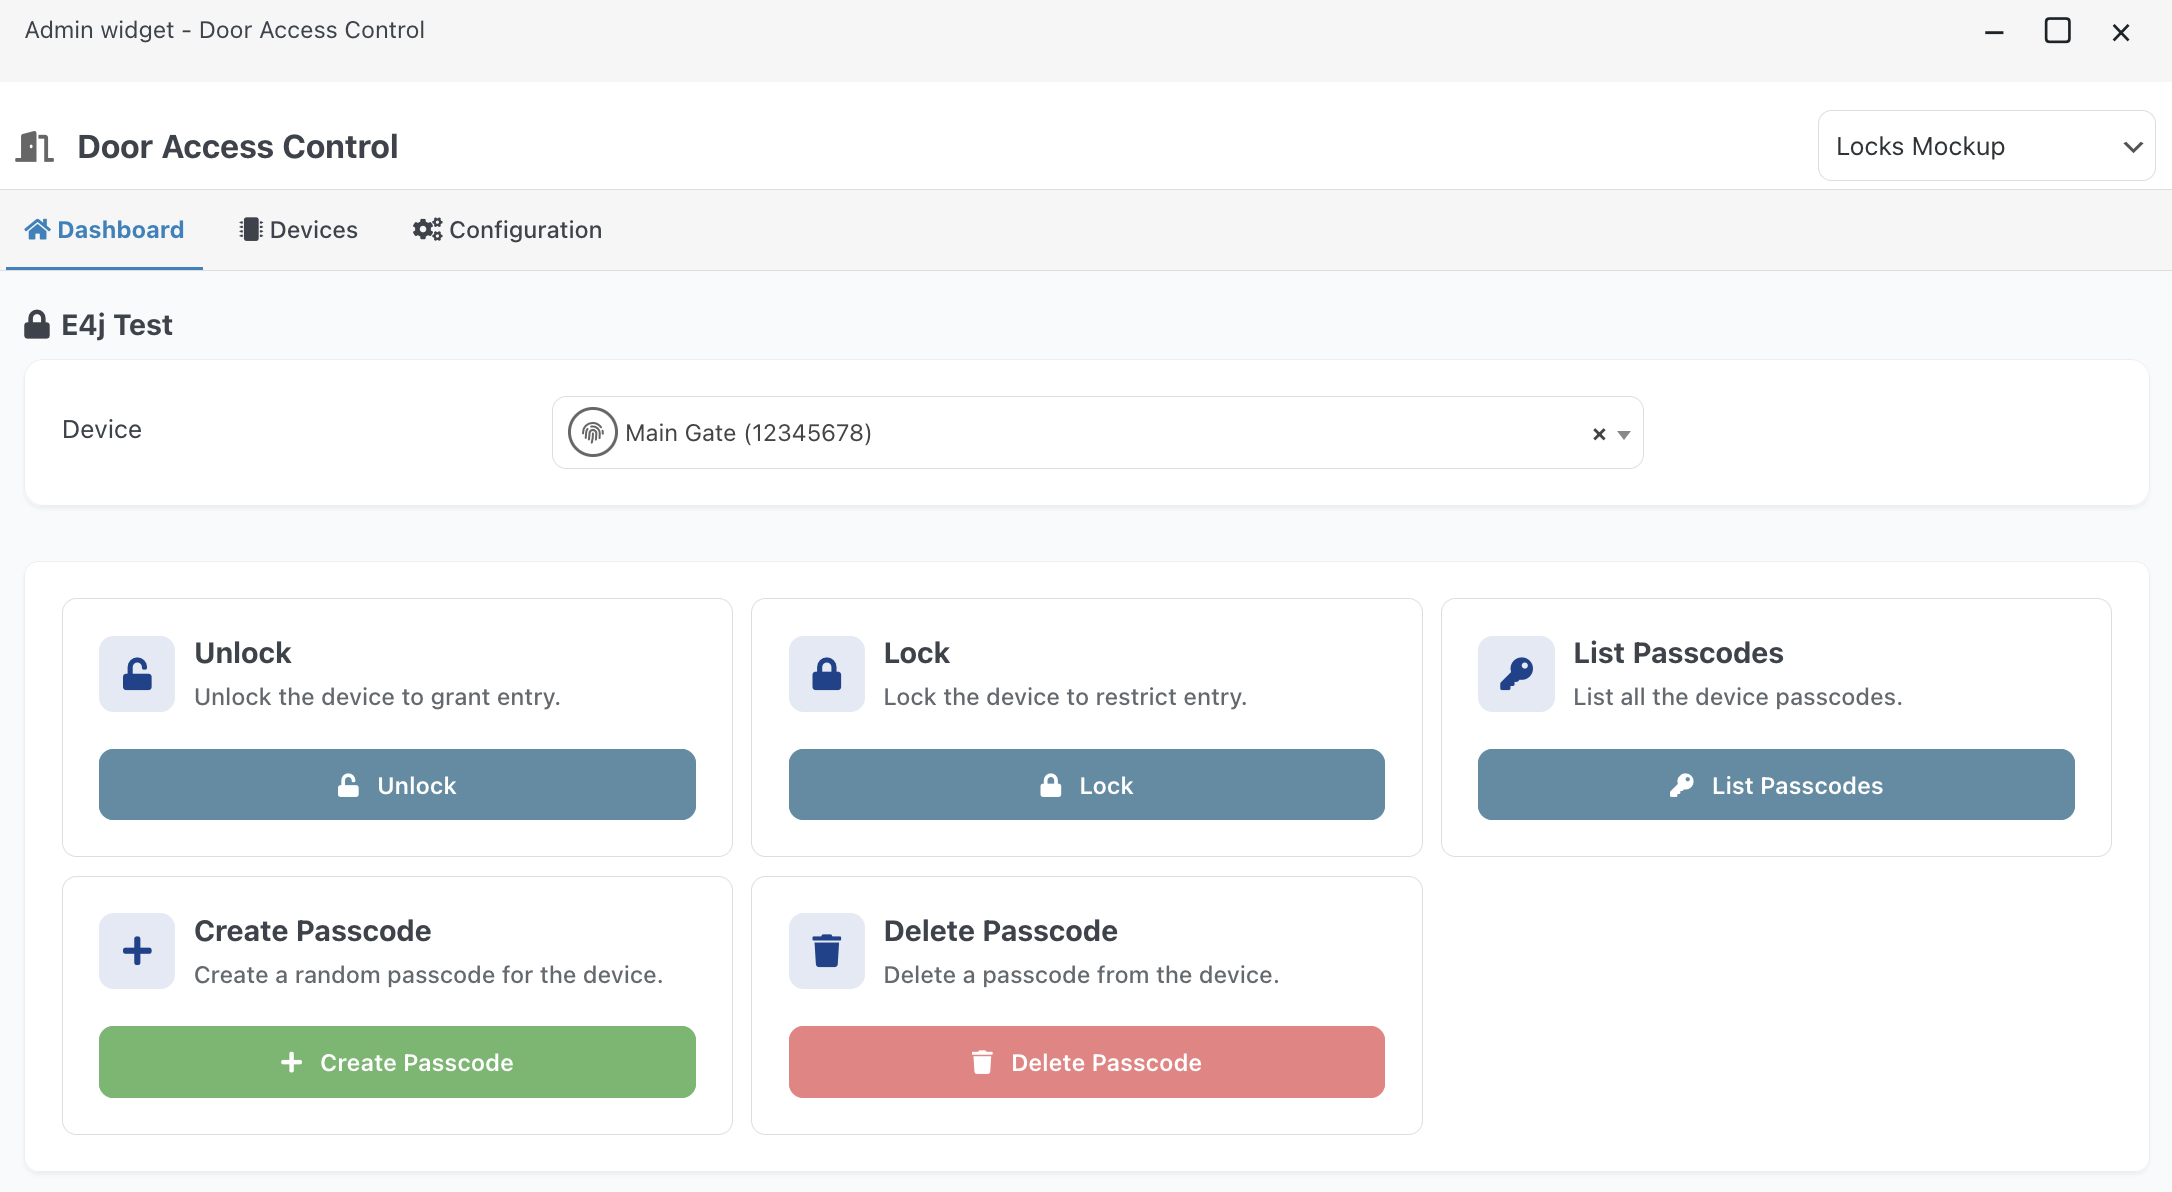
4. Commands
To operate a Smartlock, go to the Dashboard tab and select the device you want to manage—for example, Main Gate.
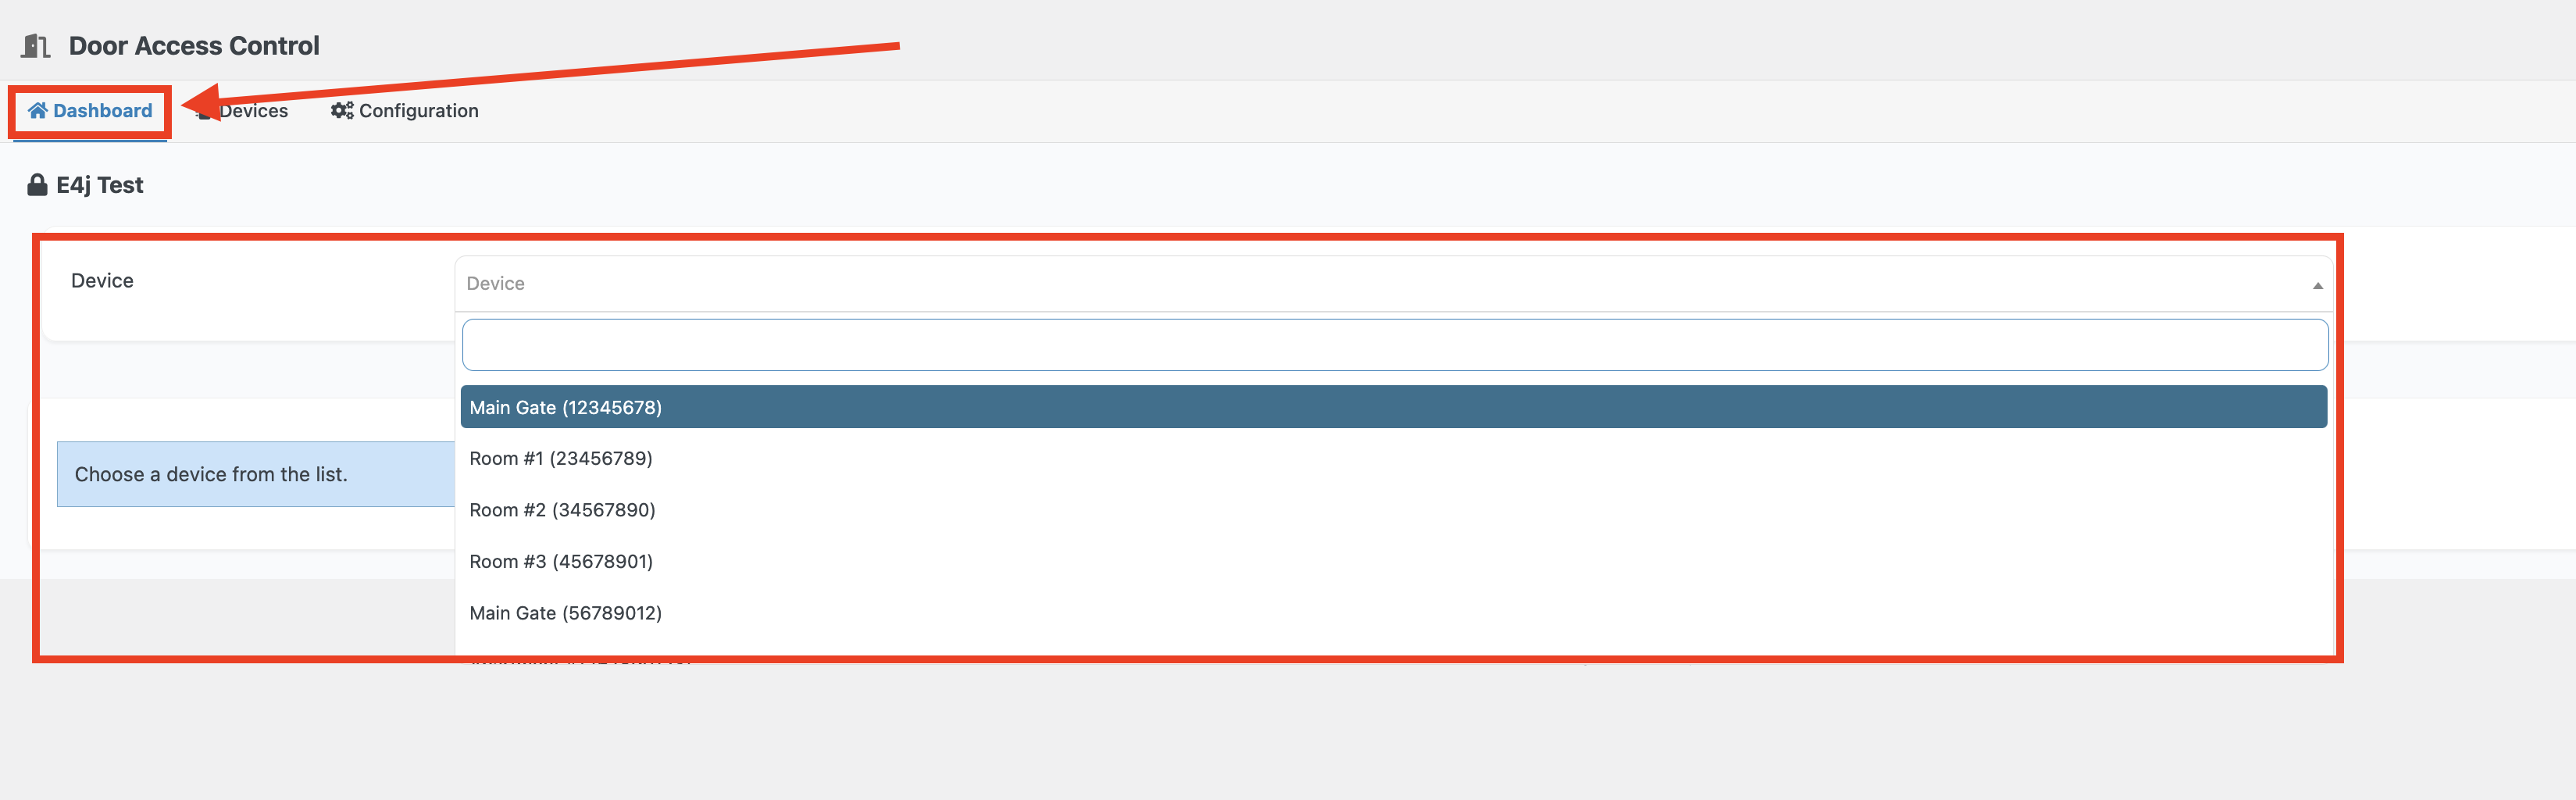
Available commands include:
- Unlock – Remotely unlock the device
- Lock – Remotely lock the device
- List Passcodes – View all generated passcodes for the device, including:
- validity period (start/end)
- creation date
- passcode name or ID
Manually created passcodes can have a custom name. Automatically generated passcodes follow the format:
bid:XXX-X → Booking ID + Room ID
- Create Passcode – Manually generate a new passcode for a selected date range
- Delete Passcode – Delete a passcode by name or ID (retrievable from the “List Passcodes” panel)

5. Automatic Passcode Generation
Passcodes are generated automatically whenever a new reservation is confirmed.
You do not need to create them manually.
The passcode creation event is logged in:
Vik Booking → Administration → Booking History

Vik Booking → Notification Center

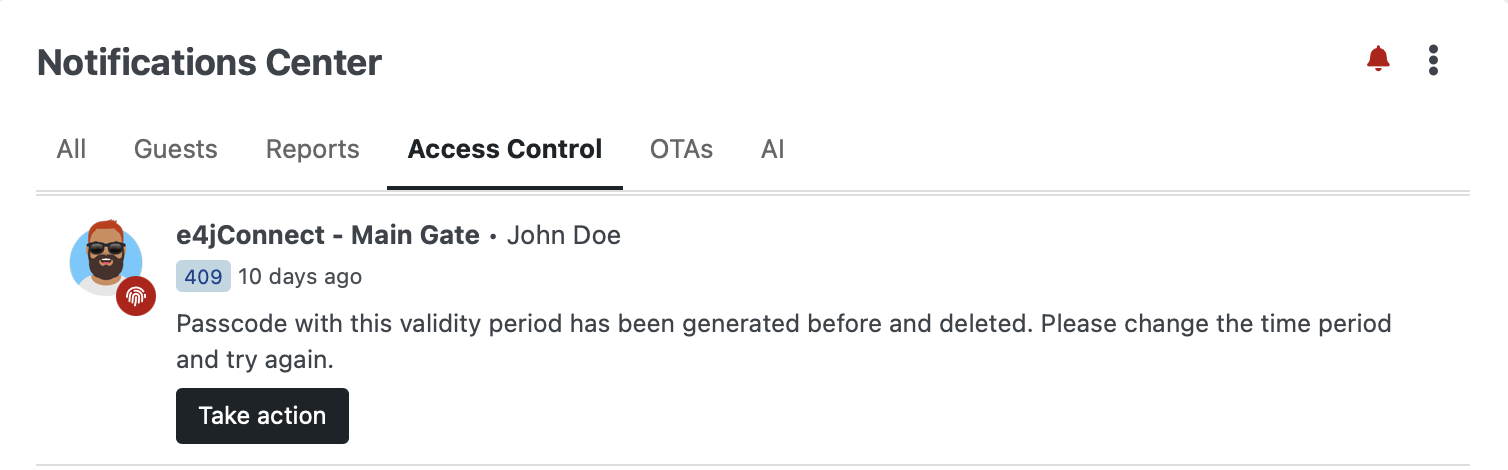
Note: The Notification Center will also display any errors that occur during passcode generation. The notification will include details about the specific error. In such cases, it is recommended to manually generate the passcode for the reservation.
Vik Channel Manager → Door Access Control → Hotel → Devices → List Passcodes.

Note: Any changes made to existing reservations (such as date modifications or extensions) will trigger the generation of a new passcode with the updated validity period. If the previous code was already sent to the guest before the modification, make sure to provide them with the newly generated code.
6. Sharing the Code with the Guests
Once a profile is configured, Vik Booking creates a Special Tag that can be inserted into any email template to automatically include the guest’s access code.
Example usage:
Using a Check-In Reminder email created under Management → Scheduled Actions with the following configuration:

In the message body, insert the Special Tag available from the Special Tags dropdown (top-right).
Each TTLock profile generates a distinct tag.
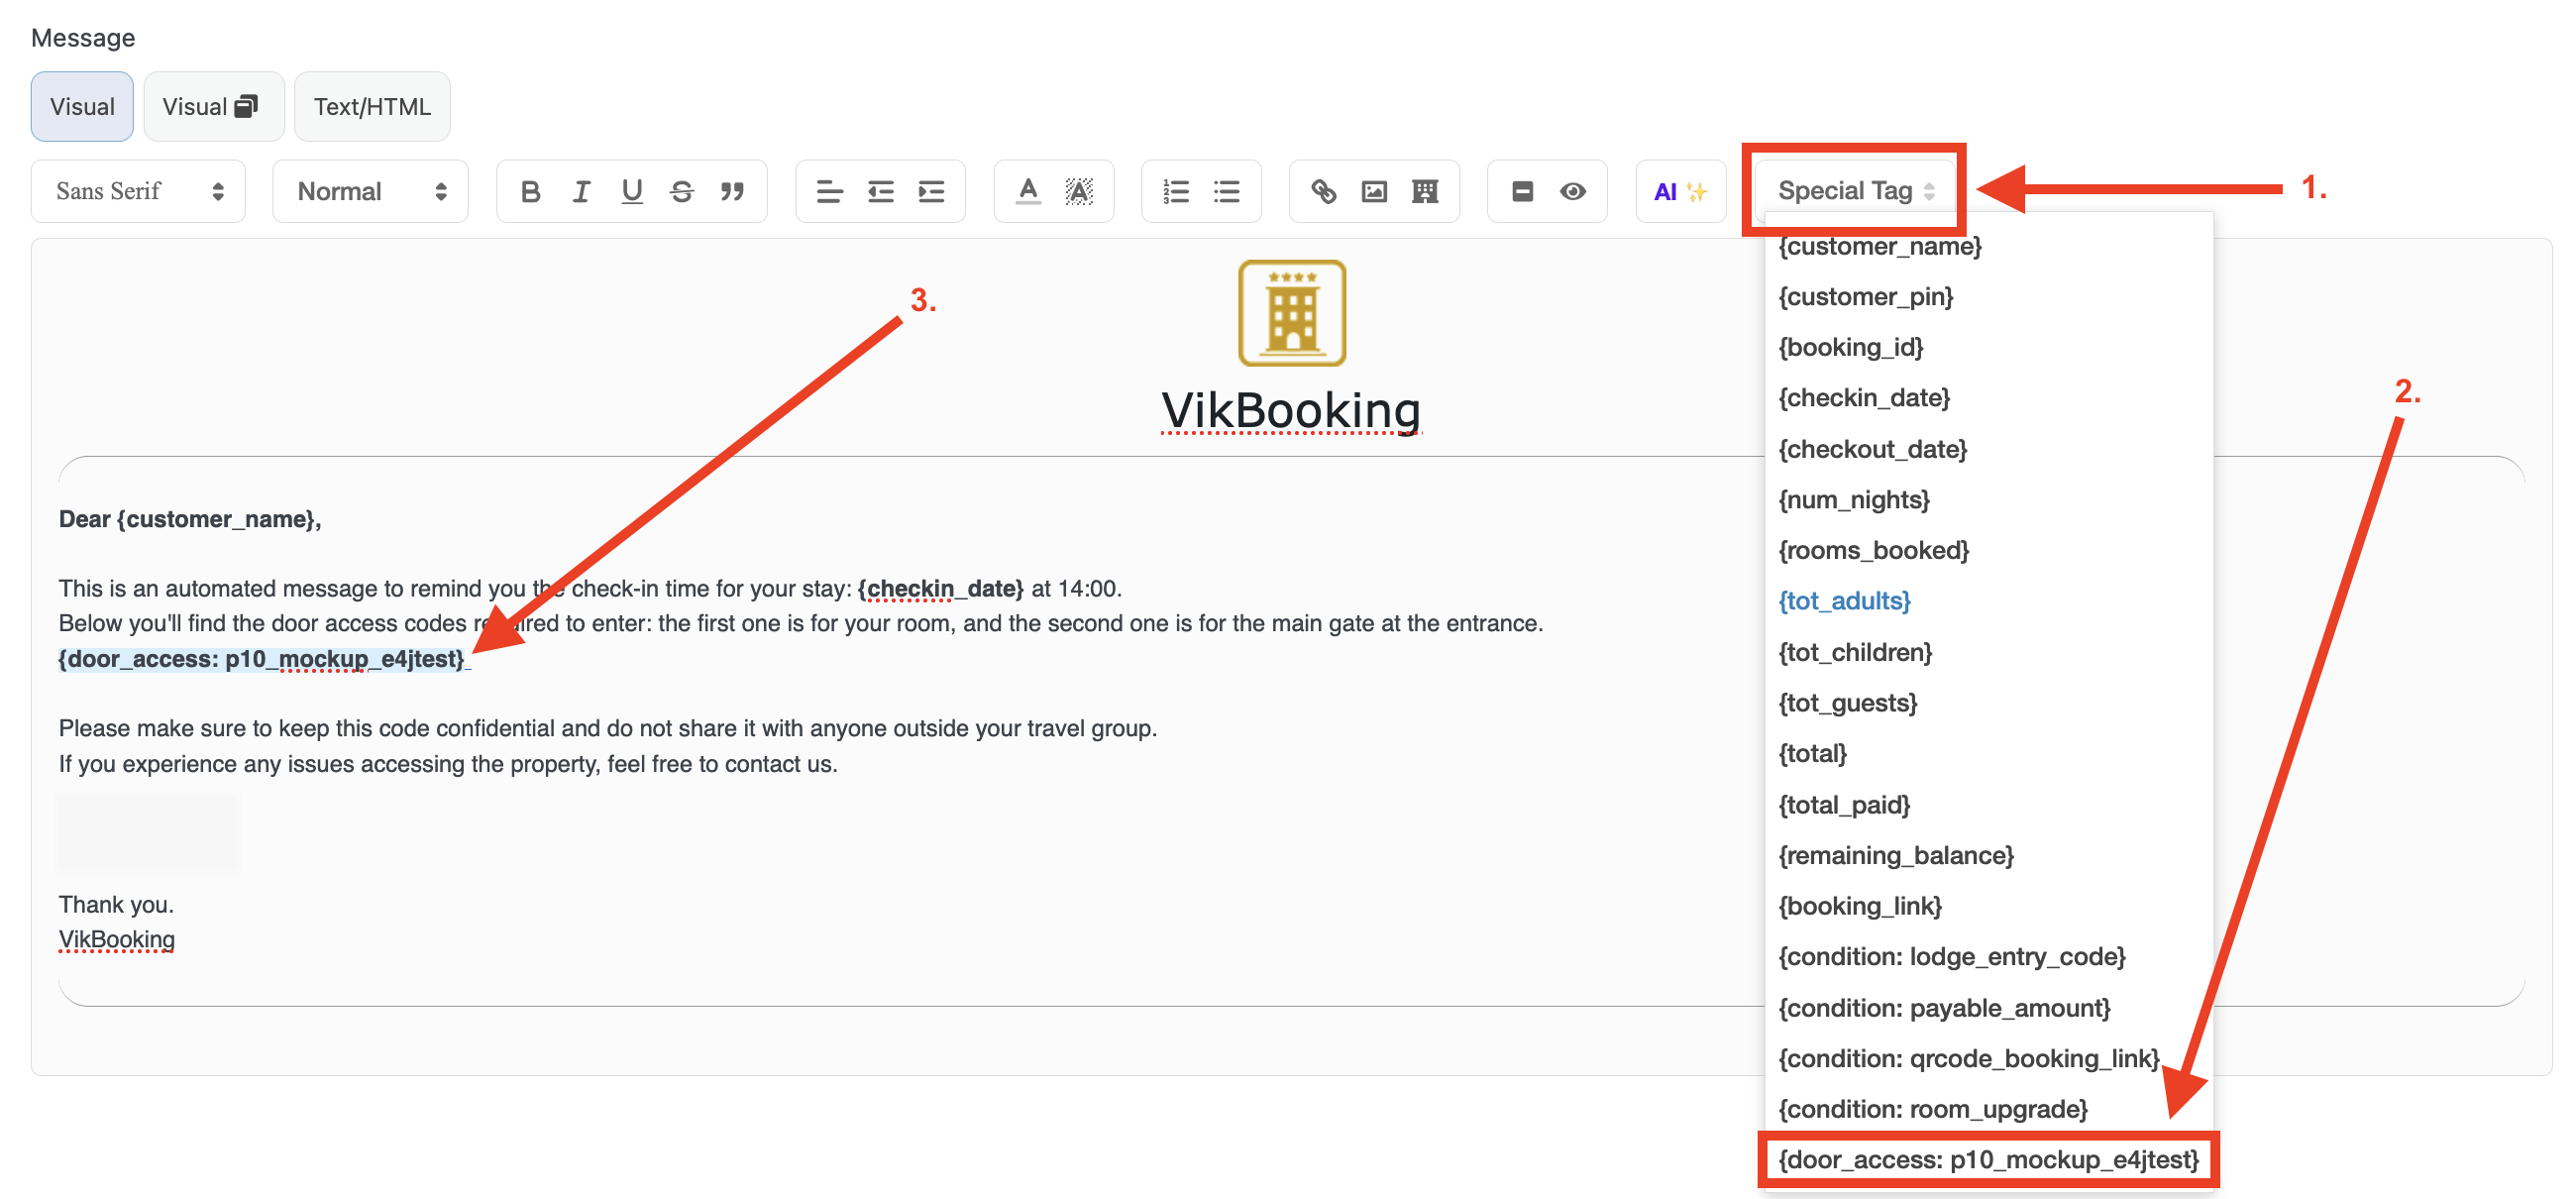
For example:{door_access: p10_mockup_e4jtest}
When the email is sent, this tag will automatically be replaced with the correct passcode for that guest.

Note: You only need to insert one special tag per profile, even if multiple devices are linked to it. The system will read the reservation details and automatically provide the correct codes.
7. Admin Widget
You can quickly access the Door Access Control framework in Vik Booking at any time using the dedicated Admin Widget. Just open the Multitask panel and search for the ‘Door Access Control’ widget.
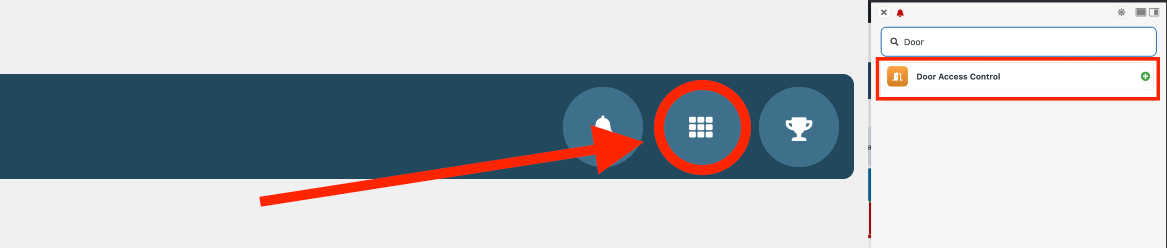
This will take you directly to the TTLock management interface without needing to go through Vik Channel Manager.
e4jConnect.com and e4j - Extensionforjoomla.com are not affiliated with or endorsed by the Joomla! Project or Open Source Matters.
The Joomla! name and logo is used under a limited license granted by Open Source Matters the trademark holder in the United States and other countries.
E4J s.r.l. - VAT N. 06794860483![]()